Thursday, 28 June 2018

Quick Activation of Server 2016 via Command Line

Having problems activating Windows Server 2016, (or previous versions Windows 8, or Server 2012) one of these three solutions below should get you through:
1.    Command Line to launch activation GUI:
This is handy if the GUI won’t start and you want to skip some steps to get it to work.
  1. Click START – type RUN
  2. Type slui 3 and press ENTER
    1. yes, SLUI: which stands for SOFTWARE LICENSING USER INTERFACE
      1. SLUI 1 brings up the activation status window
      2. SLUI 2 brings up the activation window
      3. SLUI 3 brings up the CHANGE PRODUCT KEY window
      4. SLUI 4 brings up the CALL MICROSOFT & MANUALLY ACTIVATE window
  3. Type in your product key

     2.     To Activate Windows via Command Line:
   
 1.  Launch a CMD as an Administrator
 2.   Type: slmgr.vbs /ipk xxxxx-xxxxx-xxxxx-xxxxx-xxxxx
 3.   Press Enter
If your key is valid and you are connected to the internet, it should activate within a second or two.


 3.     If above steps points failure, then call Microsoft Activation Center; direct support line at 1 800-936-4900
 

Granting Calendar Access via Exchange Control Panel (ECP)

Ex: Add-MailboxFolderPermission -identity "Managingdirector:\Calendar" -user "personalassistant" -AccessRights Reviewer
 
To change permissions on a Calendar item, type the following command:
 
This command will grant Calendar access, with level reviewer to his Personal Assitant. You can use Editor instead of Reviewer for more access.
 
If Managing director had PA in the past, you may want to remove that access. To that you can use the following command:
 
Ex: Remove-MailboxFolderPermission -identity "ManagingDirector:\Calendar" -user "oldPA"

Desktop Wallpaper Group Policy doesn't work for Win 10 clients: workaround

 
Windows 10 does funky things with wallpapers. It likes to make a cached copy in  %appdata%\roaming\microsoft\windows\themes\cachedfiles
and it will sometimes make a copy under  %AppData%\roaming\Microsoft\Windows\Themes\TranscodedWallpaper.jpg as well.
 
There is different behavior on Windows 7 and Windows 10 on desktop wallpaper. In Windows 7, when we log into the system, the cached wallpaper file will re-generated automatically.

But in Windows 10, if the wallpaper path didn’t change, the cached wallpaper will not re-generate.

After I deleted below file and log off/log on I can see the desktop wallpaper automatically changed on Windows 10.
 
%USERPROFILE%\AppData\Roaming\Microsoft\Windows\Themes\TranscodedWallpaper
So I applied this deletion operation to the domain controller as a log off  script, the script which is as below.
I created a .bat file and the content is:
del %USERPROFILE%\AppData\Roaming\Microsoft\Windows\Themes\TranscodedWallpaper


Replication to all domains

Replicate to all domains via command prompt:
repadmin /syncall /AePD

Quickly replicate to Azure AD via Azure ADConnect using PowerShell from Azure AD Connect server (if you have hybrid mode)
Start-ADSyncSyncCycle
  
via Replmon GUI:


Wednesday, 14 June 2017

System Drive running out of disk space due to installer folder

Symptom: 
Environment :

Server 2012 R2.
Test Environment for application
Problem :
almost out of disk space (C Drive). Out of 60 GB only 3GB is left. This occurs after routine Microsoft patching cycle completes. After checking the folder size we noticed that Windows Installer hidden folder utilizes over 22GB of files and WinSxS utilizes over 8GB of files. Is it advised to move 'Installer' folder to another shared location and then create a shortcut to run "mklink /D C:\Windows\Installer D:\C_DRIVE\Windows\Installer" or is there any other alternative method we need to consider to clean up the disk space.
you need to resolve this issue

Cause: 
Normal behavior


Resolution:
Creating link path into installer folder is last option 
Note : Not recommended, nor supported deleting files from this directory.
Windows Installer Cache, located in c:\windows\installer folder, is used to store important files for applications installed using the Windows Installer technology and should not be deleted. If the installer cache has been compromised, you may not immediately see problems until you perform an action such as uninstall, repair, or update on a product.

More information : 

Windows/installer folder may contain Orphaned Patches, but the tricky job how to identify the registered or not patch.
During the research I have found a script might help us, please check :

From another side please apply this update on the system and reboot “update MSI.DLL :

Additionally, thought to share this with you if applicable. The value of the MaxPatchCacheSize under HKEY_LOCAL_MACHINE\Software\Policies\Microsoft\Windows\Installer policy is the maximum percentage of disk space that the installer can use for the cache of old files

More information :
and 

There is no limitation as to how many files that we could store in the windows folders. The content in the folder c:\windows\Installer are added by the msi based installations. When they are planning to install so many applications that would lay down 7000 files, they would want to consider the space and the other performance issues as well

Therefore last efforts if above did not resolve the issue :
 1. Increase C: volume size ( if possible) (recommended action).
 2.  Workaround : (prefer to apply on test environment within the installed application).

Copy using Windows explorer C:\Windows\Installer to another disk, e.g., D:\C_DRIVE\Windows\Installer
Make a backup copy of C:\Windows\Installer

Type the following commands in a cmd.exe window running as Administrator:
rmdir /s /q C:\Windows\Installer
mklink /D C:\Windows\Installer D:\C_DRIVE\Windows\Installer


Force Active Directory replication on a domain controller

Force Active Directory replication on a domain controller

In order to force Active Directory replication, issue the command 'repadmin /syncall /AeD' on the domain controller.  Run this command on the domain controller in which you wish to update the Active Directory database for.  For example if DC2 is out of Sync, run the command on DC2.

A = All Partitions
e = Enterprise (Cross Site)
D = Identify servers by distinguished name in messages.

By default this does a pull replication - which is how AD works by default.  If you want to do a push replication use the following command:

repadmin /syncall /APeD

P = Push

You want to do a push replication if you make changes on a DC and you want to replicate those changes to all other DC's.  For example, you make a change on DC1 and you want all other changes to get that change instantly, run repadmin /syncall /APeD on DC1.

Active Directory Replication Monitor (replmon) tool can be also used to sync across all domains
- synchronize each directory partition with all servers >> push mode and cross site boundaries.

note: gpupdate /force updates the group policies

Can't send an email message when Full Access permission is granted to a shared mailbox in Exchange Server

Can't send an email message when Full Access permission is granted
Sent on behalf email bounce back with message "This message could not be sent. Try sending the message again later, or contact your network administrator. You do not have the permission to send the message on behalf of the specified user. Error is [0x80070005-0x0004dc-0x000524]"
Solution:
Seems this has to undergo cleanup activity from Caching folder

Method 1
Configure the shared mailbox as an additional account. To do this, follow these steps:
  1. On the File menu, click Info.
  2. Click Account Settings, and then click Account Settings.
  3. Select your account, and then click Change.
  4. In the Change Account dialog box, click More Settings.
  5. On the Advanced tab, click Add.
  6. Enter the name of the mailbox, and then click OK.

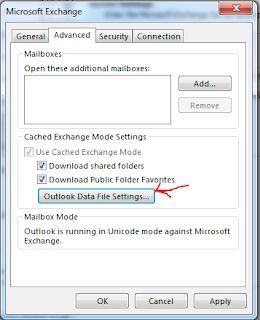
    After you make this change, the additional mailbox is listed on the Advanced tab in the Microsoft Exchange dialog box.
  7. In the Microsoft Exchange dialog box, click OK.
  8. In the Change Account dialog box, click Next.
  9. Click Finish, and then click Close.
Method 2:
Caching Folder

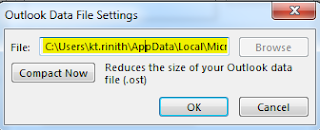
follow steps 1 to 6 to get advanced tab and click outlook data file settings

Copy the cache patch (C:\Users\??enterloggedinusername\AppData\Local\Microsoft\Outlook\ and remove the .ost and also delete files from 'Offline Address Books' folder.
We were able to send message without any hassles after this corrective approach.