Showing posts with label IT» SQL. Show all posts

Monday, 19 November 2018

Moving SQL Server tempdb Files to a Different Location in SQL 2016

SQL Server performance improves if data, logs, tempDB data and temDB logs resides in separate drives. If data and logs are in same drive, after a certain period size of database TempDB grows and logical drive C may be short of space. In this example, default location is as shown in snapshot.

How to identify current location?
stmt:
select name, physical_name as currentlocation from sys.master_files where database_id = DB_ID(N'tempdb');

Results:
tempdev       S:\Program Files\Microsoft SQL Server\MSSQL13.PINTRAAPPS\MSSQL\DATA\tempdb.mdf
templog         L:\Program Files\Microsoft SQL Server\MSSQL13.PINTRAAPPS\MSSQL\Data\templog.ldf
temp2 S:\Program Files\Microsoft SQL Server\MSSQL13.PINTRAAPPS\MSSQL\DATA\tempdb_mssql_2.ndf
temp3 S:\Program Files\Microsoft SQL Server\MSSQL13.PINTRAAPPS\MSSQL\DATA\tempdb_mssql_3.ndf
temp4 S:\Program Files\Microsoft SQL Server\MSSQL13.PINTRAAPPS\MSSQL\DATA\tempdb_mssql_4.ndf

..as seen using SQL (console) management studio

So, based on best practice let us move the tempdb data and logs from S drive and L drive to T and M drive respectively.
(please note that drive letters can vary, here in my environment I have used these letter for mapping drives)

As we have seen existing Path of tempdb data is at S:\Program Files\Microsoft SQL Server\MSSQL13.PINTRAAPPS\MSSQL\DATA  and existing Path of tempdb log is at L:\Program Files\Microsoft SQL Server\MSSQL13.PINTRAAPPS\MSSQL\Data

Let us move tempdb data to T:\Program Files\Microsoft SQL Server\MSSQL13.PINTRAAPPS\MSSQL\Data  and tempdb log to M:\Program Files\Microsoft SQL Server\MSSQL13.PINTRAAPPS\MSSQL\Data

Statement:

Use master;
Alter database tempdb modify file (name = tempdev, filename = 'T:\Program Files\Microsoft SQL Server\MSSQL13.PINTRAAPPS\MSSQL\Data\tempdb.mdf');
Alter database tempdb modify file (name = templog, filename = 'M:\Program Files\Microsoft SQL Server\MSSQL13.PINTRAAPPS\MSSQL\Data\templog.ldf');
Alter database tempdb modify file (name = temp2, filename = 'T:\Program Files\Microsoft SQL Server\MSSQL13.PINTRAAPPS\MSSQL\Data\tempdb_mssql_2.ndf');
Alter database tempdb modify file (name = temp3, filename = 'T:\Program Files\Microsoft SQL Server\MSSQL13.PINTRAAPPS\MSSQL\Data\tempdb_mssql_3.ndf');
Alter database tempdb modify file (name = temp4, filename = 'T:\Program Files\Microsoft SQL Server\MSSQL13.PINTRAAPPS\MSSQL\Data\tempdb_mssql_4.ndf');

Results:
The file "templog" has been modified in the system catalog. The new path will be used the next time the database is started.
The file "temp2" has been modified in the system catalog. The new path will be used the next time the database is started.
The file "temp3" has been modified in the system catalog. The new path will be used the next time the database is started.
The file "temp4" has been modified in the system catalog. The new path will be used the next time the database is started.

Now Restart SQL server services for PINTRAAPPS instance

It is always good to delete orphaned data, so Delete Tempdb.mdf and Templog.ldf files  from old location (S & L drive).

I hope the above makes sense.

Wednesday, 31 August 2016

Troubleshooting The remote procedure call failed. [0x800706be] WMI Error in SQL Server 2012

SQL: You may end up getting "The remote procedure call failed. [0x800706be] WMI Error" when you click SQL Server Services in SQL Server Configuration Manager as shown in the snippet below.
This error pops-up when you have SQL Server 2008 or SQL Server 2008 R2 running along with SQL Server 2012 on the same machine OR you have installed Visual Studio 2012 OR while activating SharePoint 2013 features OR by activating any of the additional components you want to activate on the back-end machine (SQL 2012 & above) which thereby automatically installs SQL Server 2012 components.

One of the solution is to recompile MOF File to resolve "The remote procedure call failed. [0x800706be] WMI Error"
for this ..Open command prompt under administrative privileges i.e., using "Run as Administrator" and execute
mofcomp.exe "C:\Program Files (x86)\Microsoft SQL Server\100\Shared\sqlmgmproviderxpsp2up.mof"

Now, you can go ahead and open SQL Server Services under SQL Server Configuration Manger to see all SQL Server Services

BUT, in some cases we have experienced this may not turn out success for you.
So, make sure the SQL Server Configuration Manager which you are trying to OPEN is from the right executable version (SQL2008 or SQL2012) as there will be two executable files. So if you try to open the shortcut on a SQL 2012 installed machine you will definitely end up with EMI Error.. All what you can do is UNPIN and PIN the right executable.

Tuesday, 29 April 2014

Failover cluster node setup Errors

setup errors in SQL cluster environment..
TITLE: SQL Server Setup failure.
------------------------------
SQL Server Setup has encountered the following error:
Object reference not set to an instance of an object..
------------------------------
Solution:  Open Failover Cluster Manager and move the Instance in question related resources to the other node and re-deploy the SQL server failover cluster node setup.

Tuesday, 24 September 2013

CREATE DATABASE failed with clustered Microsoft SQL Server 2008 instance : resolved

Trying to create a database on a clustered SQL 2008 instance? Getting the following error message?
Cannot use file
'D:\MSSQL10_50.MSSQLSERVER\MSSQL\DATA\myDatabase.mdf' for clustered server. Only formatted files on which the cluster resource of the server has a dependency can be used. Either the disk resource containing the file is not present in the cluster group or the cluster resource of the Sql Server does not have a dependency on it.
CREATE DATABASE failed. Some file names listed could not be created. Check related errors.
If so, you forgot to configure the disk dependency in Failover Cluster Manager! SQL prevents you from creating databases on volumes which aren't a dependency of the SQL Server resource. This is to prevent situations where SQL Server comes online before the disk containing the database which would lead to a "I can't see the database!" error from SQL.
To remediate this, simply add the dependency.
  1. Open Failover Cluster Manager
  2. Select your clustered application
  3. Right-click the SQL Server resource, and then bring the resource into an Offline state by clicking Bring Offline.   
  4. Right-click on your SQL Server resource then click Properties.
  5. Click on the Dependencies tab.
  6. Click the Insert button to add an additional row, then select the shared disk that contains your SQL databases.
  7. Ensure that all resources are required (there is an AND next to subsequent resources) then click OK.

Wednesday, 28 November 2012

Scheduled Maintenance Plan for SQL Express DBs

Automate Database backup with SQL Express using scripts and batch schedule

Let us automate database backup in SQL Express with mixed Windows and SQL Authentication running on Windows 2008 Server.   This material was tested with Microsoft SQL Server 2008 R2 Express and SQL server 2005 Express Edn.

SQL Server 2008 Enterprise comes with Maintenance Plan feature.  SQL Express edition lacks this feature.  But you still need a backup.

Backup automation with SQL Express can be carried out by following the steps:
i) Create the script in sql to backup all your databases.
ii) Execute the script by initiating it from a command prompt (SQLCMD command).
iii) Schedule the script using Windows Task Scheduler.

i)
-- script starts here

DECLARE @dbName        VARCHAR(33)    -- database name
DECLARE @path          VARCHAR(99)    -- backup path
DECLARE @fileName      VARCHAR(99)    -- backup file name
DECLARE @fileQuarter   CHAR(1)        -- variable portion of file name

SET @path = '\\192.168.16.193\backup\TestDB\Bkp\' 
-- the above path is a remote location. make sure path is changed according to the environment you may have.

-- Returns a Numeral from 1 to 4
-- Each Quarter you get a new backup file name
SELECT @fileQuarter = CONVERT (char(1),(MONTH(GETDATE())+2)/3, 112)

DECLARE db_cursor CURSOR FOR
SELECT name
FROM master.dbo.sysdatabases
-- Exclude all System Databases, if Needed - 'master','model','msdb'
WHERE name NOT IN ('tempdb') 

OPEN db_cursor
FETCH NEXT FROM db_cursor INTO @dbName  

WHILE @@FETCH_STATUS = 0
BEGIN
       SET @fileName = @path + @dbName + '_' + @fileQuarter + '.BAK'
       -- Use INIT and SKIP to overwrite previous sets
       BACKUP DATABASE @dbName TO DISK = @fileName  WITH INIT, SKIP
       FETCH NEXT FROM db_cursor INTO @dbName
END
CLOSE db_cursor
DEALLOCATE db_cursor

-- script ends here

--save the above script in .sql format (Ex. Bkp.sql)

ii) Create a windows batch file with .bat extension (Ex. bkp.bat) the content of which is as follows:

SQLCMD -E –S TST-APP1\myDB -i "c:\yourlocalfolder\Bkp.sql" -o "c:\yourlocalfolder\Log.txt"

iii) Now create a scheduled task from windows control panel. Make a schedule to run the batch file 'bkp.bat' file on a daily or weekly basis.

It is wise to take the same backup to a tape drive as per the backup plan: daily, weekly and monthly so that you don't leave a question or thought.

Required Housekeeping on SQL Server after renaming the hostname

SQL Server 2008 – Server Name Change (compiled and written by Rinith)

It might cause serious impact for your business applications running on backend SQL server, if the SQL server hosted server has been renamed without doing a proper housekeeping on the SQL Server itself.

So, in other words, if windows admin changes the server name, the following changes needs to be carried out on a sql server 2005-2008 (tested ok):

 
Changed server name shows 'hrms-app2' so we need to make this effective on the SQL server as well.
1. Open SQL Server Management Studio and click New Query.
2. Type Select @@ServerName to verify that the server name is correct or incorrect. In this example, I changed the Windows 2003 from HRMS-APP1 to HRMS-APP2.
follow the steps:
3. Next, type sp_dropserver 'HRMS-APP1'
syntax:
sp_dropserver <old_name>  (old name is the name you get from the select @@servername)
GO


4. You are now ready to add the correct name by typing sp_addserver 'HRMS-APP2', local

syntax:

sp_addserver <new_name>, local
GO


if you just mention sp_addserver 'newservername' wont show the right result, though the command will executed properly.

Restart sql server and the sql server agent by opening a command prompt and type: net stop mssqlserver and then net start msssqlserver to stop and start the sql server agent, type net stop or start sqlserveragent.

you might see a message with status 'disconnected' when executing sql queries after the above net start commands.
just close the sql management studio and start again, should work

note: A reboot might be required based on various environmental factors like:
even after reconnecting sql server name not displayed properly.. or selecting the statement showed servername as null.
this might have caused coz we executed the command sp_addserver 'HRMS-APP2' instead of sp_addserver 'HRMS-APP2', local


Restart the SQL server services with the above commands (net start...) and then see if the new servername is displayed or not.
check and confirm the server name (Select @@ServerName ) after restarting the server.


Wednesday, 8 August 2012

Important Checklist to Install SQL Server 2008 R2 Failover Cluster on Windows 2008 R2 Failover Cluster

   
Preparing server from scrap.. lemme prepare the checklist first..
in a nutshell...
  1. Configure RAID – for OS redundancy make sure disks are on raid 1 or 5 selection.
  2. Install Windows Server 2008 R2 Ent Edn.
  3. Register OS online
  4. Install latest patches including SP1 available at the moment.
  5. Change the windows updates schedule.. Change settings and choose download updates but let me choose whether to install them. This way it would be a controlled restart.
  6. Join node to domain
  7. Install Anti-Virus
  8. If using SAN Storage to present the storage disks to the server you may need to download and install HP MPIO Full Featured DSM for P6x00 family for Disk Arrays. This will present the EVA 4400 SAN Storage Disk to the Server. Or use free iscsi storage initiators see this one.  Present it to the server. Format (ntfs) the newly created disk drives. Total 4 drives preferably. i) for Quorum (max 1GB enough),  ii) for MSDTC (max 1GB enough), iii) for Log Volume, iv) for Data Volume.
  9. Create a cluster account and add to domain admin group.
  10. Node1: Add Features Failover Clustering
  11. Go to network connections and disable not in use network adapters. Select detailed view and disable netbios on heartbeat network of each nodes. Go to network properties>>ipv4 properties>>advanced>>wins>>disable NetBIOS over TCP/IP.
  12. Node1&2: Add Application Server Role  and Distributed Incoming Remote and Outgoing Remote Transaction Role and .net framework 3.5.1 feature from Server Manager.. if required make sure non-http activation is selected which is used for WCF activation.
  13. Refer Security considerations before & after SQL Server Installation
  14. SQL 2008 R2 – proceed with system configuration checker
  15. Avoid SQL server setup run from remote share.. copy the ISO image locally and run the setup. installation will be faster this way. if required download ISO magic disc for accessing ISO images.
  16. Install SQL, option: New SQL server failover cluster installation .. Point Data Drive to S.. Point Log Drive to L: If skipped you can do this at a later stage from
  17. Add mix mode authentication..
  18. Setup preferred Cluster Node to the more powerful server (say cluster node 1 has more memory, so make it as the preferred owner).
  19. Group Policy inclusion.. refer automatic restart of service accounts i) Log on as a batch job, ii) Log on as a service, iii) Act as part of the operating system
  20. Present disable non present network drivers.
  21. Enable windows firewall and include only required tcp port
  22. Install SQL to the second node. .option: add node to a SQL server failover cluster
  23. Segregate SQL service account  and include the domain service account credentials for each service. note that passwords are changed once in 3 months (production servers only) or based on companies IT policy. 
  24. If you want SQL named instance on this failover cluster then at this point select the option 1 from SQL setup: "new installation or add features to an existing installation".  At command prompt type ssms (for SQL 2008 onwards) or sqlwb (for SQL 2005) and check the connections. You may remotely check the connection by typing "telnet servername port" (default 1433).
  25. Finally remove internet access from SQL server to minimize external threats.


The credentials you provided during SQL Server 2008 installation are invalid

When providing service accounts and passwords you might encounter one of the following error messages, which prevents you from continuing the installation:
- The credentials you provided for the SQL Server Agent service are invalid. To continue, provide a valid account and password for the SQL Server Agent service.
- The specified credentials for the SQL Server service are not valid. To continue, provide a valid account and password for the SQL Server service.


Solution: you may select NT AUTHORITY\SYSTEM and proceed. Later you can change the SQL service account with a dedicated domain service account meant for starting the service.
you can also provide the account with specific roles, like local admin, domain user/ admin based on org. and application specific requirement.


Recommendation:

Automatic restart of Service Accounts
Always make sure that if you are using domain account for running the SQL service, that account needs to be part of following 3 main resultant policies (you might have to do this from AD Group Policy to automatically reflect to the joined servers):

i) Log on as a batch job
ii) Log on as a service
iii) Act as part of the operating system

This will make sure that the account with which the SQL services run are automatically started after each system reboot.

Pre-requisites for SQL 2008 R2 Failover Cluster setup: MSDTC Setup

Microsoft Distribution Transaction Cordinator  setup process:
now proceed with SQL system configuration checker on node 1.
make sure the system configuration checker gets a clean result.
now proceed with New SQL Server failover cluster installation.

SQL 2008 pre-requisites: Determine and Set the Primary NIC on a Windows 2008 Server

NIC Binding is the order at which windows loads the NIC's at boot up and takes the first one as a primary NIC.

How to Determine and Set the Primary NIC on a Windows 2008 Server

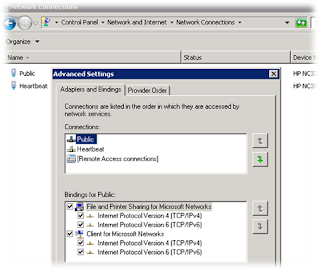
  1. Open Network Connections. You may also type shortcut ncpa.cpl from command prompt to open network connection.
  2. Press ALT key (dont hold, another list of menus will show up) Click advanced then click Advanced Settings
  3. Click the adapters and bindings tab, then under connections, click the connection you want to modify
  4. under the binding for connection, you can move the protocol up or down for the connection you have selected at the top

Validation errors while installing SQL 2008 R2 on Node 2 Cluster

The errors what I encountered while validating on SQL node 2.
Before I proceed with Node 2 installation, windows 2008 failover cluster perfectly does the failover transitions. SQL Node 1 installation successfully installed.
available online resources while proceeding to SQL node 2 (analysis service graph)
MSDTC path.
"
Validating cluster resource SQL Server (GP_PROD).
This resource is configured to run in a separate monitor. By default, resources are configured to run in a shared monitor. This setting can be changed manually to keep it from affecting or being affected by other resources. It can also be set automatically by the failover cluster. If a resource fails it will be restarted in a separate monitor to try to reduce the impact on other resources if it fails again. This value can be changed by opening the resource properties and selecting the 'Advanced Policies' tab. There is a check-box 'run this resource in a separate Resource Monitor'.
"
However the over all result showed, "Testing has completed successfully. The configuration appears to be suitable for clustering. However, you should review the report because it may contain warnings which you should address to attain the highest availability".
This warning message goes off after installing the SQL 2008 R2 on node second.

Adding SQL Node 2 Cluster services (MSCS) verification error

Error Code 0x80071398
Error..! never mind.
I evicted the node from the cluster and re-added it. Validate the cluster. It worked. Reboot when in question.
reinstall the SQL failover cluster on node 2.
I'm thrilled as failover cluster is awesome and religiously working fine. This is now my first step forward to the new infrastructure for SQL 2008 R2 consolidation project. Redundancy at its par.

Tuesday, 7 August 2012

Problem installing SQL Server 2008 R2 Failover Cluster on Node 2

Exception from HRESULT: 0x80070006
HRESULT: 0x80070006 (E_HANDLE)) ---> System.Runtime.InteropServices.COMException (0x80070006): The handle is invalid. (Exception from HRESULT: 0x80070006 (E_HANDLE)). noted in SQL Server 2008 versions.
The problem rarely occurs in a row. So restart the server. Restart the SQL node two installation.
you can also try removing the traces of SQL installation from the second node and then try setup again. This time it should go.
for SQL instance removal failure try SQL installed instance removal

Sunday, 5 August 2012

SQL instance removal failed<<Quick Instance Removal

remove the instance by running the the syntax from command prompt where the SQL setup CD is mounted:
G:\>setup /Action=RemoveNode


Sunday, 20 May 2012

How to change SQL Server Name or Instance Name

applies to all SQL ver including Denali.
i. Open SQL Server Management Studio and click New Query.
ii. Type Select @@ServerName to verify that the server name. In this example, Windows 2003 from WIN2K3R2EE to SQL Server is used. If windows hostname is changed doesn't mean that SQL Server 2005 name will be automatically changed. It will still return the old name. Let's fix it.
3. Next, type sp_dropserver 'WIN2K3R2EE'
4. You are now ready to add the correct name by typing sp_addserver 'SQLSERVER'. local
at this point if you need to change instance name, execute the below query:
sp_dropserver 'Server Name\old_Instance_name'
go 
sp_addserver 'ServerName\New Instance Name','local'
go


5. Restart sql server and the sql server agent by opening a command prompt and typing net stop mssqlserver and net start msssqlserver. To stop and start the sql server agent, type net stop or start sqlserveragent.
6. Click New Query in SQL Server Management Studio and type select @@servername to verify everything is correct and you have successfully changed the sql server name.

Saturday, 19 May 2012


SQL 2008 R2 'Cluster Name' registration failure .. event ID 1196 and Event ID 1119

this is important for setting up SQL 2008 fail-over cluster.
Check evenlog for the event id 1196 or 1119. 

cause : 
while creating static record the option "allow any authenticated user to update DNS records with the same owner" was not selected. So, cluster nodes (active node) who will own the cluster name resource won't be able to register this resource record to the DNS database.  

Solution:
Go to DNS, find the record ( A & Pointer record) for the cluster name resource.


-right click
-go to properties
-select security make sure the "Authenticated users" are included
-make sure it has "Write: rights and Special permissions
-click Advance, locate authenticated users, and click edit
-make sure, Write all properties, Read permissions, All Validated Writes are selected
-click okay three times to exit


Wednesday, 16 May 2012

check backup and restore progress in SQL Server


The below script may be helpful in checking the status of huge database activity. The below script will work for any backup or restore that is currently running regardless of which method was used to run the backup or restore.

SELECT session_id as SPID, command, a.text AS Query, start_time, percent_complete, dateadd(second,estimated_completion_time/1000, getdate()) as estimated_completion_time
FROM sys.dm_exec_requests r CROSS APPLY sys.dm_exec_sql_text(r.sql_handle) a
WHERE r.command in ('BACKUP DATABASE','RESTORE DATABASE')

percentage of database activity completion and estimated time taken to complete.


SQL Backup and Restore.. any version

GUI simplified and short.....

Backup Database:
in this example citrix CAG database (qdc-ctx-aac) is explained.
Rt. click from the DB name to be backed up. select tasks>>backup
select destination disk. click Add button to select destination on disk.
(location C:\CitrixLive\BKP\QDC-CTX-AAC.bak)
under options verify the required selections. under general selection make sure the backup type is Full. and then click ok.
Restoration  to a different SQL Server from SQL 2005 to SQL 2008 or Denali (SQL 2012)
(same or different OS versions- 32 or 64bit doesn't really matter)
select source for restore.. from device.. click add.. select the location.. (in our case it is C:\CitrixLive\BKP\QDC-CTX-AAC.bak) and click ok.
select restore backup set
select the auto-listed database or provide a new name of the database you need to restore with.. in our case qdc-ctx-aac.
select options page
select restore options
and check the box Overwrite the existing database (with replace) just to make sure you are overwriting a database if that exists, if not no need to select the check box.
restore the database file as:
make sure the data is restored to the write folder; the volume where you actual have space.. can any other drive where you have space. avoid keeping database in C Drive (OS drive). for better performance make Data (.mdf) and Log file (.ldf) in independent drives (if you have more partitioned volumes).
click ok.
migration of database part is almost done from SQL 2005 to SQL 2008 or to SQL 2012.
finally Rt. click and select properties of the particular DB.
select Options page.. make sure recovery model is set to Full... and select the compatibility level is set to SQL Server 2008(100)
 
and then click OK.
setting the permissions is important for the restored database. Existing authorized user will be automatically inherited. if you need to change the permission to a different user, at this instance you need to do it to avoid CAG communication errors.
in our case we gave dB ownership privilege.
that's it.
now you can go back to reconfigure CAG DB move.