Sunday, 13 November 2016
Tuesday, 25 October 2016
how to configure the “Replicating directory changes” for SharePoint 2013 via AD
How to configure the "Replicating directory changes" for SharePoint 2013 via AD
I can guide you in this matter by providing you with a reference and key points that may help you in your issue.
note that delegation to grant Directory Changes permission on a domain should be done on Root Domain level. The Replicate Directory Changes permission enables the synchronization account to read AD DS objects and to discover AD DS objects that have been changed in the domain. The Grant Replicate Directory Changes permission does not enable an account to create, modify or delete AD DS objects.
Reference:
Thursday, 20 October 2016
Unable to activate RDS
Activate RDS
SYMPTOM:
- Unable to activate RDS.
- A balloon pops-up stating that ‘terminal service (remote desktop services) will stop working’ on the activated server as seen below.
- Licensing manager window we can see two entries related to total licenses (see the screenshot). This was mistakenly entered. So, please guide us to remove one entry. We need to modify the current entry and retain atleast 105 license instead of multiple license related entries.
RESOLUTION
Reconfigured the RDS and use Edit Deployment task to assign the License Server.
References:
Some new users are unable to see public folders - Server: Exchange 2013 - Client: Outlook 2013
SYMPTOM:
Outlook Public Folder Not Showing for some recently created users even after appropriate permissions were set via ECP
I would like to share the engagement which we had with Premier Microsoft Support to resolve the reported issue.
ENVIRONMENT: Exchange 2013 and Outlook Client 2013
CAUSE:
New users were assigned to wrong “DefaultPublicFolderMailbox”
RESOLUTION:
Executed the following command to change DefaultPublicFolderMailbox to the working Public Folder Mailbox for affected users.
Set-Mailbox -Identity testpf1@qfcra.com -DefaultPublicFolderMailbox "qdfcra.com\users\All Public Folders"
To check to the default public folder mailbox of the user who can view public folder, output to a file:
Get-Mailbox -Identity usermailboxname (or usermailbox fqdn) | fl > publicfolder_visible.txt
To check to the default public folder mailbox of the user who cannot view public folder, output to a file:
Get-Mailbox -Identity usermailboxname (or usermailbox fqdn) | fl > publicfolder_notvisible.txt
ex: Get-Mailbox -Identity myname@myname.com | fl > c:\publicfolder_visible.txt
Open myname.txt and search for public folder and check the DefaultPublicFolderMailbox and compare to the mailbox users who already can view/ or has a functional public folder
Now set the user's DefaultPublicFolderMailbox whose public folder isn't visible to the user's DefaultPublicFolderMailbox identified from above process whose public folder is visible
Set-Mailbox -Identity TestPF1qfcra.com -DefaultPublicFolderMailbox "myname.COM/Users/All Public Folders"
References:
Wednesday, 31 August 2016
Exchange 2013: Hide Mailbox from Address List
Exchange 2013: Hide Mailbox from Address List
In an organization you might need to hide a mailbox from the GAL for some reason. The procedure to do this is quite straight forward and can be achieved using the Exchange Admin Center or the Exchange Management Shell.
Hide mailbox using the Exchange Admin Center:

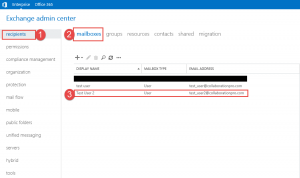
- Step 1 -> Click on Recipients link.
- Step 2 -> Click on Mailboxes.
- Step 3 -> Click on the mailbox where you want to hide from the GAL.
Once you have located the mailbox you can double click it or click on the pencil.

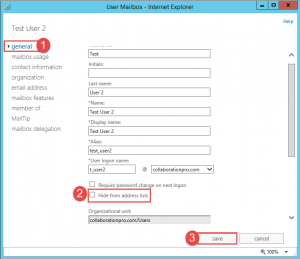
- On the properties page for the user, ensure you are on the general tab/page.
- Look down to where you see the option to "hide from address lists".
- Select this option and then click the Save button.
Hide mailbox using the Exchange Management Shell:
- Set-Mailbox -Identity Domain\User -HiddenFromAddressListsEnabled $true
Updating the Global Address Book in Outlook 2013
Updating the Global Address Book in Outlook 2013
The Global Address Book (GAL) is a directory of available contact information for CUMC, NYPH and Columbia University faculty, staff and students. It can be accessed when using a CUMC Exchange account with Outlook or when logged in to the Outlook Web App.
If you are not seeing correct contact information in the GAL for someone that has a valid email address (i.e. someone who just received a CUMC Exchange account, a new student, someone who recently changed their directory information) please use the steps below to synchronize your computer's locally cached version of the GAL.
1. Select the Send/Receive tab in the upper left corner of Outlook.
2. Click on the Send/Receive Groups drop down menu, then Download Address Book...
1. Select the Send/Receive tab in the upper left corner of Outlook.
2. Click on the Send/Receive Groups drop down menu, then Download Address Book...
- De-check the Download changes since last Send/Receive option
- Make sure the \Global Address List is selected from the Choose address book drop down menu
4. Click the OK button at the bottom.
- The most recent version of the Global Address List will be downloaded from the CUMC IT Exchange server. You may see a status window indicating the download's progress, it will automatically disappear when completed.
- On Menus tab, click Folders menu
- Choose Recover Deleted Items in the drop down menu
- Then the Recover Deleted Items window pops up
If you have not Classic Menu for Outlook 2007 or 2010 installed
6. In Outlook 2010 and 2013, there is no Tools menu in the Ribbon.
- Click Folder Tab
- Move to Clean Up group
- You may see the Recover Deleted Items button lies in the group
Customize the Remote Connection port for an Azure V2 VM
Customize the RDP port for an Azure V2 VM:
Plan A outlined below is more straightforward, we first change the RDP port from inside the VM, then we make Windows firewall and NSG rule to allow the new port.
Plan B outlined below is recommended. We use a NAT rule to route customized port --> 3389. In this way, we can change the external port anytime later and it doesn't involve additional modify from OS level.
Plan A
Important: Don't cut the branch while sitting on the branch!!
So, in a nutshell please note that :) Do not restart the server when prompted until and unless completing below steps 1 to 3. This can be hectic if you change port from registry level (mentioned in step 1) and then restart without allowing firewall port (mentioned in step 2)
step 1) Change RDP port on Windows level.
For the steps, please refer to https://support.microsoft.com/en-us/kb/306759
step 2) Allow the customized port on Windows Firewall.
For the steps, please refer to http://www.howtogeek.com/112564/how-to-create-advanced-firewall-rules-in-the-windows-firewall/
step 3) Allow the customized port on NSG.
To do this, go to Azure Portal, click on your VM name, click on Network Interfaces, click on the NIC name, select Network Security Group, click on the Network Security Group name, add the inbound security rule here.
Plan B
1) Create the Azure Load Balancer.
2) Create a Backend pool and associate it with the Load Balancer.
3) Create a NAT rule to route the customized port to default 3389.
4) Associate a NAT rule to the VM's NIC (VNIC)
For more detailed steps, you can refer to the articles below.
Subscribe to:
Comments (Atom)


