Monday 26 August 2019

Start/Stop VMs during off-hours solution in Azure Automation, Log Analytics


To automate the start and stop of the VMs hosted on Azure we need to consider two things, i) Automation Account and ii) Log Analytics Workspace

Scenario:


Set up the first solution deployment to start few VMs at 6 AM and stop them at 6 PM from Monday to Friday.

Then you would make the second solution deployment to start the other few VMs at 10 AM and stop them at 10 PM from Sunday to Thursday.

Please read through the steps, as you would have to specify the resource group/s you want this action to be taken, and you would also have to exclude the VMs on which you don’t want the solution.


For example, if you have 20 VMs in one resource group, but you only want the first 8 VMs to be started and stopped by the solution, you would have to specify the Resource Group name during deployment process and a list of the excluded VMs (VM9, VM10, VM11 … VM20).  This way, the solution will only affect (start and stop) VM1, VM2, VM3… VM8.

I have used the naming convention ‘StartStopVMDaily-IRIS-AA’, where IRIS stands for the project vendor and AA stands for Automation Account, and for ‘StartStopVMDaily-IRIS-LA’ LA stands for Log Analytics. Make sure both automation account and log analytics have the  same resource group name.


To summarize following are the process:


All services>> Automation Accounts>> click Add 

Add automation account name and fill in other relevant details for - ‘StartStopVMDaily-IRIS-AA’  and click create.


Then let’s go to the service, ‘log analytics workspaces’ via All services>> Log Analytics workspaces:


Click Add. 


Fill in sensible details for ex: 

StartStopVMDaily-IRIS-LA >> Subscription: Enterprise >> Resource Group: provide resource group name of the hosted VMs >> Location: West Europe >> Pricing Tier: Free (select what suites you) and click OK.


After creation of Log Analytics workspaces, click on 'StartStopVMDaily-IRIS-LA' which has been just created (as highlighted below).


Click workspace summary


from Overview window click 'Add' option from the marketplace search window, type 'Start/Stop VMs during off-hours' 


and click Create  


as soon as create button is clicked >> from 'Add Solution' space select workspace as 'StartStopVMDaily-IRIS-LA' >> automation account as 'StartStopVMDaily-IRIS-AA' >> configuration: configure parameters >>


parameters:

vm runbook: target resourceGroup Names: wildcard '*', * is applicable to all resource groups, else specify correct resource group where the VMs reside >> VM Exclude List (list of VMs which needs to be excluded>>  enter the VM names in the space provided. For more than one VM enter with coma >> enter schedule daily start and stop time (specify correct time zone >> select email functionality if required and specify a valid email address.>> click ok and click create.

Click log analytics workspace 'StartStopVMDaily-IRIS-LA' which we just created. and click workspace summary


Selecting the graphical ‘startstopvmview’ provides a historical summary of the schedules.


If you may want to modify the schedules to recur automation weekly or monthly based on your requirement following Home>> Automation Account >> select the required automation account (for ex: ‘StartStopVMDaily-IRIS-AA’) >> click Schedules >> Scheduled-StartVM or Scheduled-StopVM


Settings:


 You may include or exclude VMs by modifying the variables:


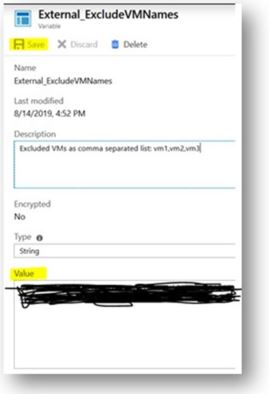
Automation Accounts >> StartStopVMDaily-IRIS-AA >> Variables

Select External_ExcludeVMNames and modify the Value (VMNames described under it)


Reorganize automation account and log analytics @your Azure portal favourites:
Deploy the solution twice based on the above scenario.


I hope the above depicted pictures are self-explanatory.
Have a great time J.

also read@Microsoft documentation

Thursday 15 August 2019

Configure email notifications in Azure

 
Review the steps to edit/ remove the e-mail notification here.
 
Slight changes have been made in the User Interface by Azure team. Go to Monitor >> Alerts >> Manage actions >>


Then select your subscription and modify the Start/Stop action group:
 

Cannot share folder and files to external parties via OneDrive

Issue:
cannot share folder and files to external parties via OneDrive. it give message "your organization's policies don't allow you to share with these users. please contact your IT department for help (OSE201).
 
Key Points:
 
One of the possibility is that External Sharing was turned off for your tenant. To resolve this follow the below steps:
 
Navigate to https://admin.onedrive.com (OneDrive Admin Center) -> Sharing -> It was on “Only People in your organization” to “New and existing external users” for SharePoint -> then it will enable external sharing for OneDrive as well, with the same option and save it. Which will allow us to share with new and external users
 
If you wish to restrict it with only certain number of users then please create a security group (https://docs.microsoft.com/en-us/office365/admin/email/create-edit-or-delete-a-security-group?view=o365-worldwide) -> add users there.
Then navigate to SharePoint Admin Center -> Sharing ->  check option “Let only users in selected security groups share with authenticated external users” -> add security group -> Save
 
Also check the below mentioned article for reference :


Thursday 25 April 2019

Enable Automatic Replies for another user

Setting up Out-of-Office on behalf of another user


Via Exchange PowerShell

If you are an Exchange administrator, then using the Set-MailboxAutoReplyConfiguration Exchange PowerShell command is the supported and native way to go to enable Automatic Replies without logging on to the mailbox itself.


Syntax:
Set-MailboxAutoReplyConfiguration -Identity <username> -AutoReplyState Enabled -InternalMessage "Internal auto-reply message." -ExternalMessage "External auto-reply message."

tested in windows 10 client w office 2016, Exchange 2013 running on windows server 2012 R2 environment

Sysprep before converting it to Template

How to prepare a VM with Sysprep before converting it to Template
During VM deployment I saw it many times where people don’t run VM customization wizard during deployment and later faces duplicate SID issues, hence we need to prepare a VM with Sysprep.
To ensure not to face duplicate SID issue, its better to prepare the OS using Sysprep before converting the VM to Template.
Prior to converting a VM to Template, just remember to use Sysprep as follows,
Run Sysprep, c:\Windows\System32\Sysprep\sysprep.exe
Ensure ‘System Out-of-Box Experience (OOBE)’ is selected and Tick the ‘Generalize’ option and Select ‘Shutdown’ from the Shutdown Options.

(You can do the same in one go using this command “C:\Windows\System32\sysprep\sysprep /oobe /generalize /shutdown”)
Once the machine has shutdown, convert it to Template/Image or Clone and you are good to go!
This will trigger sysprep process inside newly deployed VM after its first Power On.
Note: Yes during VM deployment, Sysprep will come to the picture right at the VM deployment phase where you have 3 options:
1. Do not customize
2. Customize using the Customization Wizard
3. Customize using an existing customization specification
If you had already prepared the template VM with Sysprep the you can choose Do not customize here.