Monday, 1 April 2013

Windows Auditing to track user activity

Windows Auditing to track user activity
It is perhaps important to answer "who did it" without using a third party apps to point it. Windows has this feature where we need to proactively ensure that the setting are activated to produce the results.
Occasionally, someone deletes a particular important document or folder with a bunch of documents, resulting in a mission-critical data loss. Considering the described incident, few questions immediatelly arise:
§  At what date and time the incident took place?
§  Which backup should be used to restore the data?
§  Was that an accident or an intentional user action?
§  Or maybe that was some system failure that could happen again?
In Windows OSs, there is an Auditing subsystem built-in, that is capable of logging data about file and folder deletion, as well as user name and executable name that was used to perform an action. The Auditing is not enabled by default because any monitoring you use consumes some part of system resources.
Steps to enhance Auditing Objects
order to enable Auditing, log on to a computer that keeps shared folder structure with administrative permissions, click Start Run and launch gpedit.msc MMC console. In a Computer Configuration node, open Windows Settings → Security Settings → Local Policies → Audit Policies folder:
Double-click Audit object access policy and select Success checkbox. Select Failure based on the org requirements. This policy enables file, folder and Windows Registry access attempts that were ended in a success.
Simply enabling policy option is not enough. It is also required to designate what folders exactly are to be watched. Usually, we require auditing shared documents and business application data folders (accounting, warehouse databases and so on) – i.e., resources accessible for editing by multiple users.
Since it's not possible to guess who has tampered with a data, we configure auditing for Everyone system group. Thus, information about any user having deleted a watched object is to be captured and stored to the event log. Open the required shared folder properties and switch to the Security tab. Click Advanced → Auditing and add Everyone to the list, then mark both Delete checkboxes:
It is highly possible that there will be too much events listed, so it is a good idea to configure the Security event log settings. To do this, click Start → Run and launch eventvwr.msc MMC console. Right-click the Security event log, select Properties and set the following options:
§  Maximum Log Size = 65536 KB (for workstations) or 262144 KB (for servers)
§  Overwrite events as needed.
Frankly, the log sizes recommended above are not calculated by any formula but are to be choosed depending on particular computer usage experience.
Finally, how do we find out the person (Windows 2003)?
When the situation comes to the question, log on to the required computer, click Start → Run and launch eventvwr.msc MMC console. Open Security event log for viewing. It is highly possible that not only the required events are logged. Right-click event log and select the View → Filter command. Consider the following events to be filtered:

§  Event Source:Security;
§  Category:         Object Access;
§  Event Types:      Success Audit;
§  Event ID:         560;


how do we find out the person (Windows 2008)?
When the situation comes to the question, log on to the required computer, click Start → Run and launch eventvwr.msc MMC console. Open Security event log for viewing. It is highly possible that not only the required events are logged. Right-click event log and select the Filter Current Log command. Consider the following events to be filtered:

§  Event Source:     Security;
§  Category:         Object Access;
§  Event Types:      Success Audit;
§  Event ID:         4663;
So user activities are very likely to be noticed in event logs because it generates tens and even hundreds successful Object Access records in a second. In fact, it's easy to recover the deleted stuff from previous day backup. We were always able to answer questions "Who did it?" and "When did it happen?" either using the above activity logs or via paid apps services ManageEngine –ADAudit Plus –(give a try if you have a budget for $1.3k annually).


Tuesday, 26 March 2013

Remote Server Administration Tools for Windows 8 and Pin to Start Admin Tools


Its an ease-to-use feature for the infra admins.. try this out.
 
Download "AD Remote Admin Tool - Windows6.1-KB958830-x64-RefreshPkg"  works for windows 7 64bit Edn. However , for Windows 8 you need to download "AD Remote Admin Tool - Windows6.2-KB2693643-x64" select the appropriate file for OS editions.
 
In windows 8 you need to download and install to activate AD remote administration.
 
 
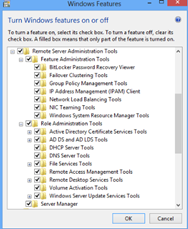
Go to Control Panel>>Programs and Features>>Turn Windows Features on or off>>and select the required AD features.
 
to view Administrative Tools as Tiles on Windows 8 a quick procedure is to click windows key and let the Tiles be displayed first
 
select settings and then click Tiles. Now glide the 'Show Administrative Tool' button to include this feature (pin to desktop). This will show up all the administrative tools as tiles on your desktop. You can now decide which tile needs to be unpinned from the Start and customize the way you need your windows be friendly with you.


Tuesday, 19 March 2013

Kindergarten Graduation Day Debut Speech by Venus


Venus Rinith


DMIS kindergarten graduation day debut speech by Venus  - (Age: 5 ½ years)


    Rehearsal at home


Lil Masters

How to Change the Product Key in Windows 8

First hurdle after windows 7 to windows 8 in-place upgrade which I came across is the licensing factor. Fairly there are easy mechanisms to tackle this as well which I have mentioned below:  
Unfortunately, if you try and activate a PC using a generic volume license key (GVLK) through Microsoft's Activation Servers
Microsoft provides two fairly easy mechanisms to perform this task: one from the command line and the other from the GUI. Today we're going to tackle both methods.
Run the command prompt using elevated admin permission. With your valid Multiple Activation Key (MAK) at the ready, login to the Windows 8 PC using an account that has administrative privileges. Be sure the PC is connected to the Internet, otherwise the activation portion of this exercise is doomed to fail. However, even if you don't have Internet access you can still change the product key now and activate it later. But for now, it's time to get this show on the road.
First, move the cursor to the lower left hot corner and perform a right-click. Click Command Prompt (Admin) from the popup menu.
Click Yes if you're prompted by the UAC to Elevate.
At the command prompt type: slmgr.vbs -ipk {MAK Product Key gets entered here} then press Enter.
(An example of this command line is slmgr.vbs -ipk AAAAA-BBBBB-CCCCC-DDDDD-EEEEE )
Click OK when prompted that the product key was installed successfully.
If you enter an incorrect product key, a dialog box will pop up stating that the product key is invalid.
If you happen to stumble upon this invalid product key message don't fret. Double check that you have a valid MAK and then try the command line again.
Once you have a valid MAK in the system, it's time to activate. Type slmgr.vbs -ato and then press Enter. Click OK to acknowledge that Windows 8 has been activated.
Using the GUI to Change the Product Key in Windows 8
One method down! Now here's how to do the same process from the GUI.
First, move the cursor to the lower left hot corner, right click, and then click Run (alternately, press the Windows and R keys at the same time).
In the Run dialog box that appears, type slui.exe 3 then click OK. The Change Product Key GUI will open.
Enter the new MAK product key in the text box. If the product key is valid, you'll see a message below the text box that reads, "Your product key works! Continue when you're ready."
Press the Activate button.
The screen will change and display "Activating Windows".
After a few seconds (occasionally a bit longer), you should see a screen letting you know that everything went swimmingly. Click Close.
That's it -- you're finished! You now can quickly and easily change a Windows 8 PC from using a GLVK to a MAK.

Win 8 HOT STUFF..!

I started using windows 8 (beta version) since Sept. 2012. After reviewing the new OS, I would rate this as HOT STUFF and fantabulous on the placards. I have come across lot of them saying 'windows 8 is a crap'. But, in reality is not. The point is, one should actually know how to use it.  Improvised technology released with a new version is always the better than the previous is what I would say in general. "You have to adapt the technology, it's shortcuts and its transition methodology..!"

Animation Converter Software

I used Text Logo Maker to create swf file and converted swf file to gif using free swf to gif converter.
Motto of The Scholars International School Doha, Qatar  (CBSE Indian School)

Thursday, 28 February 2013

Solution: Outlook 2010 Search Not Working

 
Search feature in Outlook saves 10 times of your manual email search time. Do you still need a manual search in this hoo-ha world? So, why not if the feature is not working get it sorted out.

Outlook 2010 Search Not Working
Applies to: Windows 7 OS with upgrade of Office 2010 with Outlook from Office 2007 or 2003.

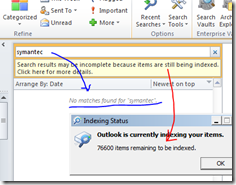
as per articles I tried re-building index, however didn't work for me.
re-indexing in outlook 2010, showed no satisfactory results..
In windows XP, installing 'windows search' plug-in showed the proper results, however complaints were reported about performance of system and was a bottle neck for such plug-ins.
For OS windows 7 onwards:
Considering the solution from lots of articles was to Turn Windows Indexing Service back on.
1. Control Panel >> Programs >> Programs and Features >> Turn Windows Features on or off
2. Tick (check mark) the Indexing Service check box and hit OK
You may want to restart your computer just for good measure.  You will need to wait for a while for the indexing service to Index everything (many hours), but after a short time (half hour) you can check your email search bar and find that some of your email is now showing in the search results.
This feature worked for one of the reported client in our org. However, for me the status of index remained the same. Search results didn't either show any results.

So I disabled and turned the feature OFF as it was earlier. If you don't turn off, unnecessary resource would be added at the background and such piled up resources at a later stage will create performance bottleneck.
So, the only solution for me was to REPAIR the Office 2010. And in next 15 mins it showed the results positively.
To do this in win 7 just click start and type programs and features and click the result as seen below:
Click Change option under microsoft office 2010 which will bring up the option to repair the corrupted office files
selection window
progression window
The overall process might take 15mins. That's it. After a reboot of system, my search results showed results as expected.