Monday, 3 October 2011

Windows authentication fail in IIS 7

Windows Authentication fails from client machines via hostname/ FQDN or ip address but works on localhost (where the application is published)

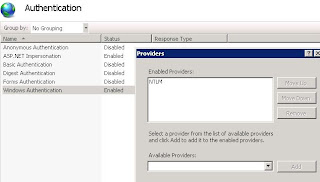
Windows authentication supports two authentication protocols, Kerberos and NTLM, which are defined in the <providers> element. When you install and enable Windows authentication on IIS 7, the default protocol is Kerberos. The <windowsAuthentication> element can also contain a useKernelMode attribute that configures whether to use the kernel mode authentication feature that is new to Windows Server 2008.

Windows authentication is best suited for an intranet environment for the following reasons:
 •Client computers and Web servers are in the same domain.
 •Administrators can make sure that every client browser is Internet Explorer 2.0 or later.
 •HTTP proxy connections, which are not supported by NTLM, are not required.
 •Kerberos version 5 requires a connection to Active Directory, which is not feasible in an Internet environment.


The following default <windowsAuthentication> element is configured at the root ApplicationHost.config file in IIS 7.0, and disables Windows authentication by default. It also defines the two Windows authentication providers for IIS 7.0.

<windowsAuthentication enabled="false">
   <providers>
      <add value="Negotiate" />
      <add value="NTLM" />
   </providers>
</windowsAuthentication>


by default for SharePoint - 80  environment only NTLM is required.


Best practice to change SharePoint service account passwords

How to change service accounts and service account passwords in SharePoint Server 2007 (MOSS2007) and in Windows SharePoint Services 3.0
microsoft site reference: http://support.microsoft.com/kb/934838

Just changing domain account password from sharepoint services and from Application Pool identity will not do.
you have to follow the above article.
in short execute the following in batch (.bat) file will also do:
----------------------------------------------------------------------------------------------------------------------------------------------------
cd %commonprogramfiles%\Microsoft Shared\Web server extensions\12\Bin

stsadm -o updatefarmcredentials -userlogin domain\enterusernamehere -password enternewpasswordhere
iisreset /noforce

stsadm -o updatefarmcredentials -userlogin domain\enterusernamehere -password enternewpasswordhere -local
iisreset /noforce
           
stsadm -o updateaccountpassword -userlogin domain\enterusernamehere -password enternewpasswordhere -noadmin
iisreset /noforce
       
stsadm -o spsearch -farmserviceaccount domain\enterusernamehere -farmservicepassword enternewpasswordhere
iisreset /noforce

stsadm.exe -o spsearch -farmcontentaccessaccount domain\enterusernamehere -farmcontentaccesspassword enternewpasswordhere
iisreset /noforce
       
stsadm -o editssp -title (SharedServices1 change accordingly) -ssplogin domain\enterusernamehere -ssppassword enternewpasswordhere
iisreset /noforce
----------------------------------------------------------------------------------------------------------------------------------------------------

InfoPath published Forms error using DNS Record: Event ID 5566, in MOSS 2007 64Bit

InfoPath Form Services Error accessing data source eventid 5566 in SharePoint 2007 

SYMPTOM:
Forms when accessed through the browser using DNS Record (A Record created in DNS: intranet) was showing error. There are no issues when accessing the same forms using hostname(http://intra-app1)

ENVIRONMENT:
SharePoint 2007 SP2 (CU August 2011: 12.0.0.6565), OS: Windows 2008 R2 Enterprise Edn.

SCOPE:
Published Forms opens properly from client access using WFE server hostname (http://intra-app1 ) (Hostname of WFE: intra-app1)
However, the forms could not be accessed using the DNS entry (http://intranet). shoots errors ID 5566 as seen below:  

ACTION:
Inorder to solve this we configured the following setting in the registry for disabling the loopback check in the registry using the following method.
In Registry Editor, locate and then click the following registry key:
HKEY_LOCAL_MACHINE\SYSTEM\CurrentControlSet\Control\Lsa
Right-click Lsa, point to New, and then click DWORD Value.
Type DisableLoopbackCheck, and then press ENTER.
Right-click DisableLoopbackCheck, and then click Modify.
In the Value data box, type 1, (hexadecimal) and then click OK.

No need to either restart the server or carryout IISreset /noforce

This is enough, just try accessing portal using the DNS and the published forms using DNS record (http://intranet). This should solve the problem.
 
Also, make sure AAM (Alternet Access Maping: http://intranet) to Intranet Zone is configured at the CA level .

Roll Out Plan for Adding iFilters in SharePoint 2007 64Bit Environment

Configure PDF iFilter 9 for 64-bit platform

The steps mentioned below are as per suggested by Microsoft. Please refer to links below for appropriate Microsoft KB articles.

>> http://www.adobe.com/special/acrobat/configuring_pdf_ifilter_for_ms_sharepoint_2007.pdf?PID=4172469
>> http://support.microsoft.com/?id=555209
>> http://blogs.msdn.com/ifilter/archive/2007/03/29/indexing-pdf-documents-with-adobe-reader-v-8-and-moss-2007.aspx

Download Adobe PDF iFilter 9 for 64-bit platforms http://www.adobe.com/support/downloads/detail.jsp?ftpID=4025

1. Install Adobe PDF iFilter 9 for 64-bit platforms.
2. Verify that PDF has been added to the registry.


a. Run Regedit by browsing to c:\Windows\system32\regedt32.exe and double-clicking it.

b. Within left-side tree, browse to: \\HKEY_LOCAL_MACHINE\SOFTWARE\Microsoft\Office Server\12.0\Search\Applications\{site GUID}\Gather\Portal_Content\Extensions\ExtensionList

c. If PDF extension is present, skip to Step 3 . If PDF extension is not present, continue with Step d.

d. Right click on right-side Extension List pane and choose New > String Value

e. Add a name to the new Registry Key (e.g. "38")

f. Double click the new Registry Key. For "Value data", enter "pdf"


Note: This can also be achieved via SharePoint Server Search Administration page by adding 'pdf' to list of File Types in Search Administration->File Types. This would automatically add an entry for 'pdf' filetype as mentioned above in step 1

3. Verify that PDF has the correct settings in a second registry location.
a. While still in Regedit, within the left-side tree, browse to: \\HKEY_LOCAL_MACHINE\SOFTWARE\Microsoft\Office Server\12.0\Search\Setup\Filters\.pdf

b. Verify the following values. If values are not as shown, edit them.
i. <REG_SZ> Default = <value not set>
ii. <REG_SZ> Extension = pdf
iii. <REG_DWORD> FileTypeBucket = 1
iv. <REG_SZ> MimeTypes = application/pdf

4. Verify that PDF has the correct settings in a third registry location.
a. While still in RegEdit, within the left-side tree, browse to: \\HKEY_LOCAL_MACHINE\SOFTWARE\Microsoft\Office Server\12.0\Search\Setup\ContentIndexCommon\Filters\Extension\.pdf
b. Verify the following values. If values are not as shown, edit them.
i. <REG_MULTI_SZ> Default = {E8978DA6-047F-4E3D-9C78-CDBE46041603}


5. Verify that pdf.gif is present at the following location:

C:\Program Files\Common Files\Microsoft Shared\web server extensions\12\TEMPLATE\IMAGES

6. Add an entry in docicon.xml for the pdf icon:

C:\Program Files\Common Files\Microsoft Shared\Web Server Extensions\12\TEMPLATE\XML
<Mapping Key="pdf" Value="pdf.gif">
Note: Step 4 & 5 are done in order to have the pdf icon in SharePoint while it displays the search results.

7. Restart all SharePoint services as well as IIS.
a. Launch the DOS Shell (Start > All Programs > Accessories > Command Prompt).
b. Type the following at the prompt: "net stop osearch". Wait for success message.
c. Type the following at the prompt: "net start osearch". Wait for success message.
d. Type the following at the prompt: "iisreset". Wait for success message.

 Close the Command Prompt window
8. Microsoft Office SharePoint Server can now index PDF files. Also, PDF icon should show in File Types list

Roll Out Plan for PDF Configuration in SharePoint 2007 64Bit Environment

 How to add an icon to Windows SharePoint Services to represent Adobe PDF documents that are stored in document libraries
firstly, download adobe icons (small & large) http://www.adobe.com/misc/linking.html
  1. Navigate to C:\Program Files\Common Files\Microsoft Shared\Web Server Extensions\12\Template\Images
  2. Copy in the Adobe PDF Icon PDF icon. Rename it to "pdficon.gif".
  3. Navigate to C:\Program Files\Common Files\Microsoft Shared\Web Server Extensions\12\Template\xml
  4. Locate the Docicon.xml file open with an xml editor.
  5. Within the ByExtension tag add a new Mapping tag in alphabetical order with the following properties.
  6. <Mapping Key="pdf" Value="pdficon.gif" />
  7. Save the file. The Value needs to be the same as the icon you saved in images. Your file should look something like this.
    Extract from Docicon.xml showing pdf icon properties

Sunday, 18 September 2011

SharePoint Site Error 503

SharePoint Site Error: Service Unavailable HTTP Error 503. The service is unavailable
** when we traced back the recent changes we could identify that from the CA Search Administration 'reset all crawled content' option was recently triggered which ended up with SSP page error 'Service Unavailable HTTP Error 503. The service is unavailable'. 
** other possible reason could be if you change the identity or account password either directly from IIS settings or if at all from web config file.
** another reason could be if you install another web based program or add feature.. unexpectedly causing IIS to stop the SharePoint services. for. eg: if you install AD on the same machine, OR added a new web site with a duplicate port.
make sure  that Web site protocols starts properly and the user account used to start Applicaion pool is correct and starts as well.
steps:
i.  Open up IIS Manager and click on Application Pools.
ii.  Locate your App Pool account and right-click on it and select 'Advanced Settings'.
iii. Click on the right of the Identity box to change it (A window will pop up).
iv. Click on Set and simply retype your App Pool Identity in there with the new password.

List stored user names and passwords

Start > Run > type "rundll32.exe keymgr.dll, KRShowKeyMgr"